FILE MENU
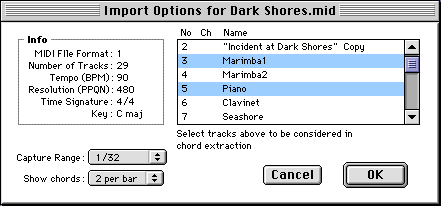
Import MIDI This will import a standard MIDI file, extract its chords and display them in a chart. First you will be presented with the Import Options Dialog. Here the tracks the file contains are shown. Click on whichever you want to be included (use Shift or Cmd as per Chord Chart window).
Capture Range
How near (on either side of) each beat a note has to start for it to be included
in the process.
Show every: Which beats per bar to display. (NB 3/4 bars will show on
beats 1 and 3, 5/4 > 1 and 4 etc, reflecting the usual musical harmonic rhythm
with these time signatures).
These parameters mean you can exclude, for example, a busy bass line or a sax
solo which is just playing round the chords. If you know that there's a simple
keyboard part that just lays down the chords you could just select that track.
But make sure you exclude any drum or percussion tracks, as these will seriously
spoil the chord extraction!
It's a complicated process that can need a little trial and error for good
results. In particular it may be spoilt by overlapping notes. Notice that when
you choose Make Chart, the window stays open to allow further tries with different
settings. If you get the odd undefined chord (question mark) you can always
send it to the Keyboard Window, edit it, and send it back again.
Export MIDI You can save the chord chart as a standard MIDI file, which can then be played by any sequencer or MIDI file player. It includes information about the tempo, as well as any time and key signatures as they occur. The resolution is 96 ticks per beat. Chords last up to the next chord, or the end of the bar, whichever comes first. A small gap of 12 ticks is inserted between chords.
Page Setup The default page size is A4, portrait, 100%. To change the default, go to Page Setup when no chord chart window is active. Otherwise the new size, orientation and magnification will be reflected in the active chart window. NB Most printers will not print right up to the edges.
Chord Name (Cmd-E)
When the Keyboard Window is selected
Chord Name lets you define how the displayed chord should be named. If you select
'use text below' from the popup you may type in your new name. The other menu
selections will use whatever symbol for that chord type (ie major, minor etc)
you have selected in Preferences. Change the root by sliding (you can't double-click
here) but notice that any chord name must have either the root, or the 'slash'
note equal to the lowest note in the chord. When quitting, you will be asked
to confirm any such edits which will then be saved to disk. If you want to go
back to the original 'factory' names you may check the relevant box in Preferences.
Again you will be asked to confirm the reversion on quitting.
When a chord chart is selected
Selecting Chord Name or double clicking a chord in a chord chart will let you
edit the name for that chord only. The program intelligently interprets
what you type and displays it with the usual formatting, unless
you precede what you type with an asterisk. For example, just type fsm7,
or bb7/f. If you want to specify that some text should be up on the numbers
level, precede it with 'N'. So if you wanted Bb9
to display as B, with a flattened ninth, type bNb9. Note
that this new name only applies to that particular chord. If you want to redefine
the default name for that combination of notes, edit it (Cmd-E again) in the
Keyboard window. To revert to the original chord
name type 'n' (you can also use this to update a chord chart where you
have redefined the default names yourself).
Preferences
These apply to the application as a whole. Note that the outdated Apple Midi Manager is no longer supported. The appearance relates only to the Keyboard Window.

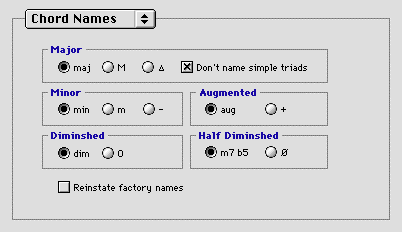
This is where you define how the basic types of chords will be notated. 'Don't name simple triads' means that C, E, G will just be called 'C' rather than 'C major'.
OMS Various settings to do with the Opcode Music System (disabled if OMS is not installed).
Chart Settings These are applied to the current chart. The 'Header space' is for page 1 only. The 'Stave size' is the number of pixels from one of the five stave lines to the next. 'Stave gap' is the distance between two staves (only active if two staves are being used). 'System' is used in classical music to mean a group of staves played at the same time.

Resetting the chord positions will also reset the strum marks (which can be nudged with Cntrl-arrow like chords). Margins can be set here, or by dragging them on the first page.

The first three settings in this menu relate to the Keyboard WIndow and are stored after quitting for next time.
Show Info refers to the information panel in the Keyboard
Window. Can also be turned on or off by clicking in the panel.
Chord Mode The default setting is on, but if you just want to hear the
notes without building up chords, turn Chord Mode off.
Sustain Normally if you want to build up chords with the mouse you want
previous notes to remain, as if a sustain pedal were on. Turn this option off
when using Chord Studio to monitor the MIDI output from another program in real
time, so that when a chord stops playing it is blanked ready for the next one.
The remaining options relate to Chord Charts. Please see the explanation on the Chord Charts page.
(OMS only) Select the MIDI channel on which notes are sent out.
Send a Program Change message, using the General Midi instrument list, or type in a specific number. Notice the selected voice is not checked, because the program wouldn't know if the voice had been changed independently of Chord Studio. However the Prg Change dialog does remember the last number you sent.
NOTE: When using QuickTime instruments, there are some dummy voices, italicized in the QT instrument picker but not here.